Tuesday, December 30, 2014

An ammunition box prop / magnetised figure case for my 6mm ACW

This has been long in the making. When I started doing my 6mm ACW collection I did magnetic bases for them with the plan of having a carrying case with metal trays you could stick the figures on. Last summer, after finishing most of the figures I plan to do, I started work on the carrying case. I wanted it to look like an ammunition box from the American Civil War, so it could double as a prop item at games instead of the usual pile of empty cardboard boxes. Reference material was easy to find, as well as instructions by re-enactor groups on how to build one.


I chose not to paint or stain the box. I suppose a lot of them were produced cheaply with whatever wood was on hand. I guess the colour will change over time depending on where I keep it. The stenciling was a pain in the ass to do, as cutting the stencil was quite time consuming. The letters are painted on, not burned ;)


I had to make a couple of anachronistic concessions. A real box wouldn't have latches like that, but the lid would be nailed shut. Obviously that wouldn't do so I used a couple of modern latches.

The screws holding the box together are Philips screws. These didn't exist during the American civil war. I looked and looked from hardware stores but couldn't find any slotted screws! Weird. Well, I suppose I can always replace the screws once I find some.

Now then, let's crack her open!


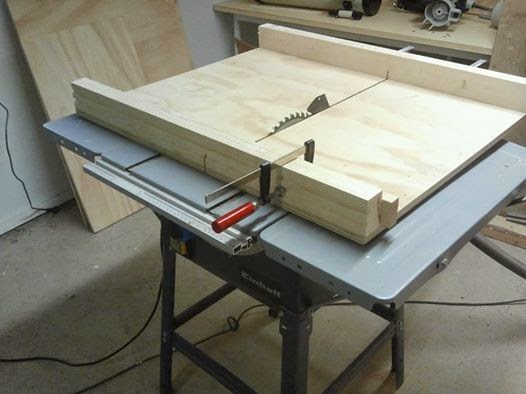
The box fits five trays that stack neatly inside. The trays have wooden sides, a metal plate bottom and leather straps to lift the trays by. I'm determined to learn how to do my own woodworking and a project such as this is good practice as the result doesn't need to be perfect. After all, it's an ammunition box, not a dining room table!


There you have it. The trays hold my collection firmly in place and there's still room for some additions if I want to do some. The only thing I'd add if I would start over is have enough room for a side compartment holding rulebooks, dice and markers. 


Sunday, December 21, 2014

The darkest of days

It's winter solstice and Finland is basking in light at 9AM like you can see:


My home is some 500 kilometers south of the polar circle so the sun does peek above the horizon today but only for about five hours. The dark period, called "kaamos" by the finns is known to cause melancholy and depression because of the extended lack of sun. I'm just happy we got plenty of snow in the last couple of days. Having a white Christmas was not a sure thing a couple of weeks ago.

Anyways, I have some wargames related stuff in the works even though I've been quite busy at work these last months (my own course to lecture, a conference in Kuwait and a brief teaching exchange to Mozambique, no less!). I'll try and finish some of that before the year ends so my score for painted minis for the year won't be quite as embarrassing! ;)

Thursday, November 13, 2014

"Smoke and fire" -markers using Led candles and cotton wool

I've seen some nice smoke & fire -markers made using led candles in the net and thought I'd give it a try. What do you think?


MVI 6405 from Mikko Asikainen on Vimeo.

- Take a small Led candle and remove the top if possible
- Take a bunch of cotton wool and knead it long enough that it becomes stiff and looks appropriate
- Attach the wool to the candle base using hot glue. You can add small bits of wool to any areas that need more.
-Give the marker a few puffs of black spray
-All done!

Saturday, November 1, 2014

Fresh from the workshop: a crosscut sled and my first dice tower

I've had some good sessions in my workshop over the past weeks. My table saw is a 100 euro piece of trash that I have big difficulties cutting stuff straight with. To help the problem I built a crosscut sled for the saw:


It's basically a plywood platform attached to the table saw and you can use it to make your cuts more accurate. So far I'm happy with the results. To test it out I needed a project where I need to do some accurate cuts and a dice tower sprang to mind. I've never had one and there are some instances where a dice tower might come in handy like when playing on a crowded table and you don't want to knock down pieces.

I made it from just your average, humble plywood which I stained to give it a pleasant colour. To make things more challenging, I used the saw to cut joints into the plywood. This makes the construction sturdy and you don't need glue or nails. It looks good, too.


The tower comes in two parts. The benefit is that you can store the tower more easily this way when not using it. Here's a video of it in action:


MVI 6326 from Mikko Asikainen on Vimeo.

How did I do?

Wednesday, October 29, 2014

Signal Close Action first impressions

I've been lazy posting my warcon 2014 games, but now I have to catch up as the end of the year I will be quite busy lecturing, doing my next research paper, applying for funding and all that academic bliss.

My first proper naval miniatures wargame, yay! I've been wanting to get me some age of sail action for a long, long time, and the host of http://landandnavy.wordpress.com/ gave me the opportunity to participare in one of his games at Warcon. Note that all the pictures in this article are of models in his collection so do pay his blog a visit!


Signal Close Action goes a bit more in the way of realism than say.. Trafalgar does. Ships are not that easy to put out of action and manoeuvering is more complex. Where the system really shines is the command and control system. If you're commanding a squadron you have to signal all orders to the ships in the fleet using orders which would be historically plausible. Also, if there is no LOS between the flagship of the fleet and the ship it is trying to send orders to, the command will not get through unless relayed by another ship.


Playing a naval wargame such as this is very different from land based games and requires a change in the way you think. You have to consider the direction of the wind and the relative positions of the fleets to it. Ships cannot turn (unless tacking) directly into the wind and cannot move directly upwind. This means you can't just "drive around" the table as you would with tanks. Also, your speed changes with your attitude to the wind and depends on your sail setting.


We had four players in our game and we played it maybe halfway through in the few hours we had to spend. It takes a while to learn the basics and it slowed us down. Movement and firing is straightforward once you get the hang of it, but signaling takes practice. At first, the game almost resembled Roborally as ships struggled to interpret orders and try not to crash into each other.


We got the hang of it eventually and probably learned enough for our first game. We played through the approach phase and a bit into the firefight between the ships until things started getting chaotic. I didn't take any notes and the photos are sporadic so I can't really give you a blow by blow. Suffice to say, a British fleet met with a French one, and at the end, the British weren't doing all that well. Two British ships had crashed into their French counterparts and the Englishmen had lost a boarding action that ensued. 


All in all, it was a real treat of a game. Right now, I'm participating in a PBEM Kriegspiel test game hosted by http://landandnavy.wordpress.com/, and it is proving to be an interesting experiment indeed.


Sunday, October 12, 2014

I have a new photography setup and some greeks and orcs to show you


Before resuming my Warcon report, I'll show off my new toy. I bought a Canon 1000D DSLR on the cheap and finally built that lightbox I've been meaning to make for a long time. The new camera will serve as an astrophotography tool but I can use it for my miniatures just as well. With two daylight bulbs (the third one and last at the supermarket fell on the floor and broke after I bought it) I'll also have good lighting to work with.

It'll take me a while to learn to get the best pictures possible with it, but I'm already noticing a marked improvement on the depth of field available compared to my old camera.

First, I have completed a bunch of Greek casualties and an additional pack of hoplites for my ancients project. I think I should paint up one more pack of hoplites to unlock the possibility of playing warmaster ancients with this set, but doing those shields really is getting tiresome.

Freshly painted Greek hoplite casualties. I think the whole set is pretty well in focus.

All of my 6mm Greeks still fit in one shot. Getting mighty weary of painting those shields!


Next, I'll show off the first of my "improved" warmaster orcs. I bought a half-painted army and I decided to finish them rather than remove the old paint and start from scratch. Let's say these count for a half of a painted figure apiece in my painting stats :)


Two units of Boar boyz

The models on the right before my touchup work.


Wednesday, October 8, 2014

Warcon 2014: Musket & Pike Edgehill

I kicked off this years' Warcon with a game of Musket & Pike Battle Series. The scenario was the battle of Edgehill from the "This accursed civil war" set. Hex & Counter games are not exactly ideal blog fodder so I'll be brief. The game series is excellent and I recommend it fully to wargamers though.

The game after the frist turn. The royalists under king Charles are advancing towards the lines of the parliamentarists. The royalist cavalry on the right engage the skirmishers sent to harry them and draw in some of the parliamentarist cavalry waiting in reserve.
Cavalry clash as the battle lines draw closer.

After the cavalry engagement, king Charles rides to the scene to rally his troops. He underestimates the speed of the parliamentarist cavalry however, and is caught by their charge. The king is slain in the ensuing mayhem, what a tragic day!
The royalists, shocked by the loss of their king lose the initiative and the parliamentarists manage to charge their line with their infantry


The situation becomes chaotic and casualties are high on both sides.


In the end, only tatters of both armies are still in fighting order, but the parliamentarists have managed to seize victory (and would have even without the massive VP score from the slain king)

It was an interesting scenario as the armies were quite symmetric and even. I think anything may happen in this scenario and it would probably work well as a tutorial game for M&P as there are virtually no deviations from the basic series rulebook. Tactically there were quite a few choices to be made. I definitely had no clue on how to use the skirmishing troops to their potential and they were easy prey for enemy cavalry. I got a lucky prey in taking out the king and managed to charge the enemy with my infantry and gain momentum bonuses. It was a close cut thing however, and I had some luck with my dice.

Stay tuned, I still have a Here I stand game to report as well as Signal Close Action!

Monday, September 22, 2014

Into the Abyss

We haven't been using our cellar this summer and I went to clean it so that we can store our potatoes, mushrooms, juice and whatnot for the winter. I was not prepared for the unnatural horrors waiting for me in the dark.

The entrance to Dungeon Level 1. It is guarded by black giant spiders not visible in the photo.
I must be cautious for there are fouler things than orcs in the deep places of the WHAT THE?!
It appears the few potatoes left lying around in the darkness have begun to spawn new life!
This is starting to look like invasion of the body snatchers!
Delving deeper I neared the source of the Lovecraftian horror hidden from the light of day..
..and faced THE THING THAT SHOULD NOT BE!
Realizing a mere broom is no match for the horrors lurking within this forgotten crypt I planted a device to cleanse the vault of the corruption that had taken over.
With smoke and fire I will purify this place!

I made my escape as the crypt of horrors filled with smoke intended to kill the fungus infestation and slammed the door shut. Now I dare not return and see whether my efforts were successful or not.

Thursday, August 21, 2014

Figuring your bases for both summer and winter

I'm tired of waiting for Baccus to produce me some napoleonic Swedes so I'm starting my Russo-Swedish War 1808-1809 project using Heroics and Ros figures. There's one problem however. The battles I want to play took place both during the winter and the summer of 1808. I either have to play the winter battles using summer bases or vice versa OR I can design the basing so that they can be easily rebased.

Now, the battles that took place when snow was on the ground are not terribly big, none of the R-S war battles were. I won't have to rebase a huge army. As the winter battles are the first ones of the war, I can do those first, then rebase the models and reuse them for the summer battles. As a bonus they will be in the chronological order. So I'll need a temporary winter basing scheme.


First you paint the models obviously. It's better to have the bases of the strips painted in brown as white is more difficult to paint over for the summer phase. Put some white acrylic caulk on the base and just stick the models on top. The stands of Heroics and Ros figures are quite thin so there won't be such a big "step effect" to cover as with Baccus figures. This works to my advantage. Paint the sides of the stand white.


Now, sprinkle baking soda on top of the stand (no glue!), remove the excess and brush away any left on the figures. This is what you should end up with. You see a little bit of the brown base underneath but I think the result is quite acceptable. The soda might shed off a bit in use but the effect is wintery and non-permanent.
 

Now, after the applause on the blogosphere after seeing your winter battles have died down, it's time for the spring to come. I blast the soda away with an air compressor, but had to use a brush in addition. Take away the rear strip using a knife. As the models were not glued on, but stood on the caulk, they come off easy and with no fuss. The next step is to paint the base brown, maybe glue on some sand or whatever you would normally do.


Here the same base has been painted, flock glued in the space between the strips, the models glued back in and the rest of the stand flocked. The white showing through the stand is just undried PVA, not snow residue. Now the models have served in both climates. Maybe I'll add a tuft or a bush there...


Monday, August 18, 2014

Paukarlahticon III


Catchy name, right? It's the product of me having enough hubris to call having ten friends over to play over the weekend a "convention" but not having enough imagination to name it after anything else than my home village. We assembled for the weekend for a series of miniature games, sauna and beer. The event was also the first time we've used my workshop/mancave as a playspace and I have to say it worked well. The space fits three individual 4*6 foot wargame tables with plenty of room left to move around the space and I think we can fit a 24*6 foot table in there if we're so inclined.

The workshop converted as a playspace. There's still room for one more table but it was not needed this time.

The theme of the weekend wasn't to play a big battle this time (unlike the previous time and before that) but to play a series of smaller, "standard" sized games. I think it was a good choice and I played a variety of different games (seven in total!) during the weekend.

Battletech alpha strike on my work in progress scifi desert planet board. The weekend showed me that the board is actually quite versatile even though I designed the set just for 6mm scifi.

The "concrete slab" bases for urban areas work quite well for the amount of work needed to make them. Definitely better than just slapping down the buildings on the table.

We played three rounds of Battlegroup Kursk on three tables semi-simultaneously. I got to play with my recently finished Germans (I also shared my command with one player without miniatures). We got our asses handed to us in every round, naturally.
a German assault gun takes out a British tank in a 1945 scenario.

The desert table set up for a WW2 cityfight. The table shows just about all kinds of building bits we could scrape together but the result was satisfactory.

German defenders spot a Sherman approaching.

A Marder tank takes a direct hit.
The second game I played. Not enough anti-tank weapons in our list.

The 88 waits for the enemy armor to come in sight.
Aaand the third game. I admit, I did place that 88 in a position in which it was easy prey for the British infantry.
A 1500 point game of Warmaster. Orcs vs. Empire.

The Orcish cavalry wing performed admirably...
..but it's success was countered by Empire cavalry elsewhere. Another defeat for my permanent record.

A game of Trafalgar using Pirates of the Spanish Main ships.

The desert table transformed into a Western town for a drunken late night game of Legends of the Old West.

The Saloon keeper and his daughters look for a hidden treasure in the town.

A showdown on the thoroughfare.

The next gaming weekend is planned for the winter if I manage to keep the workshop warm enough for it to be usable (this is Finland, as you know). Thanks to the participants, I had a blast!