Friday, December 30, 2011

Trolls and more

The dismounted cavalry remain lost. I have no idea where they are and have turned the place upside down. I wonder if I've managed to dump them in the trash alongside the mess I cleaned from the dollhouse project. If so, it is a sad loss.

It's snowing so I can't undercoat stuff to paint so I decided to try my hand at getting proper photos of those stone trolls I mentioned a while back. I think they turned out ok. I used the largest aperture value available, an exposure time of about half a second and ISO80. White balance was measured against the background. There's also a shot of the fresh Lutheran Seminary and of Skarsnik who would be commanding the trolls if I would ever want to play Warhammer Fantasy again. Let me know if you have hints on how to improve my photos. The scene is lit by two LED lamps with a screen of baking paper taped in front of them to diffuse the light. The pictures are clickable.


Gettysburg day 1 project & last games night.

"Sir, if you want to fight here, this is such lovely ground, it's the best damn ground I've seen all day." "It is that."
So, I'm back into figure painting mode. We'll be playing a good chunk of Gettysburg day 1 on the 7th of January and I've started work on it. The good news is that I have most of what I need already painted and done. I just need a few generals, some confederate artillery and Buford's cavalry division to get by. 50 figures minimum, about 250 at most. With my speed of 100 figures in an evening it shouldn't be difficult if I have the time.

I started out by painting the Lutheran Seminary building I bought off Total Battle Miniatures. It's a great centerpiece for the table and turned out all right. I had considerable trouble painting the brickwork, but it turned out good. The slight variations in the tone of the bricks I did doesn't show in the image.


Terrain-wise, I think I can manage by building a small section of stone wall to put near Oak hill, and by scratchbuilding some buildings for the portion of the Gettysburg town visible on the table. I'll leave out the fighting on Blocher's knoll as I don't have that many figures yet.

A slight problem with the project has arisen. I seem to have misplaced an entire division of dismounted cavalry. They were supposed to be the dismounted versions of Buford's division but I can't seem to find them anywhere. I undercoated them a few weeks ago and then.. nothing. I suppose this is what Lee felt when Stuart went missing! If they're truly lost, the game will lose some visual appeal as I don't have dismounted versions of the very central troops defending against the confederates on the early stages of July 1st. Ah well.

I'll also use the opportunity to log some games form a casual boardgames night with friends a couple of days ago. We played some Wings of War, Lexio, Guillotine and a overly long game of Zombies!!! I had forgotten why I haven't played it in years. Now I remember again. Not much happening and the game takes ages to play. I'm pretty much I'll sell my copy if I find someone willing to buy. Other than that, we had great fun though :)

Monday, December 26, 2011

A Christmas special

A different project this time. Me and my wife made a dollhouse for our god daughter for Christmas this year. I have lots of experience building miniatures terrain so I thought this wouldn't be that different, but working with wood and doind child-proof work presented it's own challenges. The almost-three-year-old recipient was quite happy with the results though. Have a merry Christmas everyone!

Cutting the components out of plywood in our bathroom. Great acoustics for the saw.

The finished basic structure. My wife did the painting on the piece.

The finished piece with wallpapers and a hinged roof revealing an attic.

I covered the ends of the board with a plastic railing.

The open attic with her name on the inside of the roof.

Testing it out. One of the window boards came loose after about 5 seconds of stress testing.

A positive verdict.

Also, boardgames! This is a co-op boardgame where the players try to pick all the fruit before the crow reaches the end of the "Doom track" and eats the fruit. Sort of like Arkham Horror for two year olds.

Thursday, December 1, 2011

First session of Fighting Formations

I just came home from games night at the local boardgames club, Kärmes. On the table for the first time was Fighting Formations: Grossdeutschland Motorized Infantry Division, a new contender to the tactical WW2 arena. It's a new GMT series with a series rulebook weighing in at 23 pages. Each game in the series is supposed to concentrate on historical battles of a namesake formation, although as a series first is only out at the moment, we'll have to see what the future brings.


Me and Timo only managed to play a few turns, as neither of us had played before and gameplay was slowed down by frequent browsing of the manual. The Germans were attacking a hillside position of the Soviet forces across an open plain. Infantry supported by StuG III's. The soviets had only infantry and machine guns, but they also had lots of trenches, pillboxes, wire and minefields to help. During the turns we played, the German infantry suffered a lot of losses advancing towards to Soviet line over open ground, but the StuG's punched through the Soviet line with impunity. The Soviets found themselves in a position where most of their line was out of command and tried to redeploy, which the Germans exploited by advancing on the vacated trenchline. We stopped playing just before the Soviet armored reinforcements arrived. The Germans had taken the victory locations of the scenario with their nigh invulnerable tanks but the Soviets had gained a lot of casualty victory points from the Germans and would probably have win if they had managed to retake even one of the victory locations by game's end. We managed to play several rules wrong though, so it was more of a practice match anyway.


Fighting Formations is a veritable Smörgåsbord of game mechanics. The actions assignable to troops each turn are determined by randomly placing blocks on the command list. The damage dealt to soldiers is determined by random chit draw from cups. There is a deck of cards for artillery, air strikes and special actions. Modifiers to firing change the dice you roll, so where you normally roll 2D10 against targets in open ground and normal range, you reduce that to 2D8 because of cover or increase it to 2D12 for point blank fire. The list goes on and on.

The Initiative system is what I liked most about the rules. Each time you perform an action, the initiative track shifts towards your opponent, and once it slips to his side, it's his turn to act. The simpler your actions are, the more you can perform them in one go before giving the turn to your opponent. The more complex they are, the easier it is to lose the initiative to your opponent. This gives the game turns an unpredictable and simultaneous nature and is quite brilliant. When you pick a block on your turn, you can perform the action of the slot it is on, or any slot "under" it. This means you can generally do what you want (unlike in combat commander where you are shit out of luck if you don't have a correct card) but you have to pay for it by expending more initiative than the action would normally take. Defensive fire is also performed by expending initiative.

Command and Control is achieved in a simple manner. You place a commander token on the board, and can move it around with the troops, and perform actions like shooting and defensive fire for a lower initiative cost as long as troops are within the command radius of the token. After one turn, the token is flipped and everything costs more initiative within the commander's radius. After on more turn, the token is returned to a pool where it becomes available again after one turn of cooldown. This makes it smart not to spread out your troops too thin, as I noticed. When troops are not in command, you will find yourself having to expend precious initiative to do the simplest of tasks and your opponent will dictate the tempo. 


The last smart thing Fighting Formations does is have separate counters for platoons and squads. Units enter the game as platoons, consisting of three squads, and are treated as one counter in the beginning. They can (and will if they suffer casualties) split into their component squads which can operate individually. This reduces counter clutter a lot and is a smart move.


What about the bad? Well, it's not ASL to be sure. The simpler game mechanics make the dice a bit more dominating and I didn't like how some mechanics play, especially melee. My opponent drove his StuG platoon right through my infantry platoon in a trench and didn't have the odds stacked against him in melee at all. It was quite difficult for an entire platoon of infantry to scratch three tanks driving through a trenchline without support. I found that odd, but I suppose I'll just have to find new tank hunting techniques. Also, the German/Soviet counters have too little contrast between them. It is quite easy to mistake the two under bad lighting. I hope they pay attention to this in future modules.


The simpler mechanics aren't all bad. Our first match was an attack on a trenchline with pillboxes, wire, minefields and machine guns by German infantry and armor supported by Stuka swarms and artillery strikes on both sides. It has taken me dozens of matches of ASL to be so confident with the rules as to play something like that in ASL (although we haven't tried air strikes and artillery yet!). This was our first game of Fighting Formations and already we had all that going on. The barrage system especially was simple yet quite realistic enough.


We'll have to play more of this for my opinion to mature, but at the moment it seems much better than Combat Commander or Conflict of Heroes, becoming my pick for the medium complexity WW2 tactical stuff, but of course, ASL will not be dethroned by this usurper!


PS. Sorry, no pics this time. I have some finished Stone Trolls I'll try to photograph to liven up the blog that has been all dry and hex&countery of late.


Friday, November 18, 2011

Brandywine

Me and Simo played a game of Brandywine during two sessions recently. It is one of GMT's American Revolution series games, and I'm quite fond of the series rules. This was perhaps the fourth game of the series I've played and quite interesting as a scenario.

The Battle of Brandywine was fought on September 11, 1777 during the American war of independence. I won't go into detail here as you, dear reader, can read Wikipedia same as me. Suffice to say the British and American forces are roughly equal in size, but not quality. The British have better troop quality and some badass Hessian mercenaries and such, whereas the Americans have the benefit of defence behind the Brandywine creek. That is, until the massive British flank attack hits. In the scenario, the Americans must prevent the british from getting to the road to Philadelphia along with trying to survive against the redcoats as an army.

The game started with a sizeable force of British and German troops marching on Maxwell's detachment positioned across the Brandywine creek on the American left. After the initial cannonade caused a juicy casualty reduction on a British elite unit, the Americans attempted an orderly retreat to friendly lines, but failed. Only scraps of the detachment made it back.

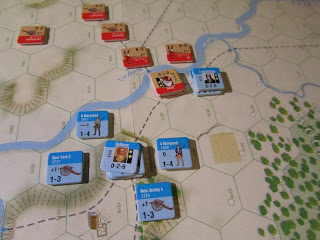
The remnants of Maxwell's detachment try to reach friendly lines across the creek.
In the AmRev series, both armies have an army morale rating which increases with positive outcomes and decreases with adversity. Even small skirmishes may end eating away army morale. Once morale deteriorates from "Good" to "Fatigued", the entire army suffers a -1 penalty to both initiative and individual morale ratings. After it deteriorates again from "Fatigued" to "Wavering" the penalty becomes -2 and the end is near. After a bit more deterioration the army routs automatically and the game is lost regardless of specific victory conditions.

In our case, the American morale started to deteriorate with Maxwell's detachment. In the American center, the British advanced on the creek with forces roughly equal to those on the other side. Brazenly they advanced over the creek.

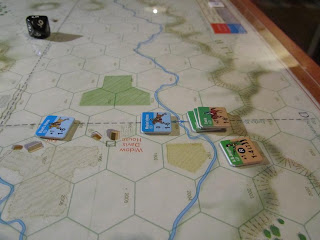
Grant's troops cross the creek in the American center.
The Americans mounted an immediate counterattack against Grant and managed to drive one of his units back to the other side. All went well until the rotund Grant decided to start performing well with his troops, fought off the American attempt to flank him, cut off lord Stirling and his men and captured them. This pushed the American morale well into the "Fatigued" zone while the British morale couldn't go any higher. The Americans tried to reverse their fortune by crossing the creek and assaulting the three British batteries they thought were vulnerable. They failed spectacularly, only managing to disorder one of the batteries. This sends the Americans dangerously close to "Wavering".

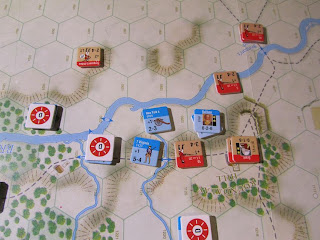
Lord Stirling attempts to flank Grant and drive him back across the creek with an attack from two directions...

...but ends up being cut off from his line of retreat and is captured by the redcoats. Small American units cross the creek in an attempt to capture the exposed British batteries and are shot to pieces.

Meanwhile on the left, the remnants of Maxwell's detachment have either crossed the creek, been shot to pieces or captured. Washington directed quite a bit of his reinforcements to this section, fearing the British would cross the creek. The British chose however, not to use their momentum and merely observed as the Americans towed a long line of guns into position.

The Americans bolster the line on the left believing the British and the Germans aim to cross.
The reason for the British inactivity soon became all too clear for poor Washington. The redcoats had sent half of their forces on a long flanking march to the American right! American dragoons posted as scouts raced to warn the army, Hessians hot on their heels. A portion of the Americans was quickly sent on a countermarch. They couldn't hope to stop the British but they could at least delay them.

On the right, American scouts report a flanking march with the Hessian elite hot on their heels!

The battle, however, would be decided on the center before the British flankers would have a chance to fire their muskets. Demoralized by the capture of Lord Stirling, the American center could hardly put up a fight. Even by concentrating attacks on singular British units with everything they had, the superiority in numbers was countered by the poor state of American morale. The level shifted between "Fatigued" and "Wavering" several times before making the final plunge when the British captured the American center batteries without suffering any casualties.  

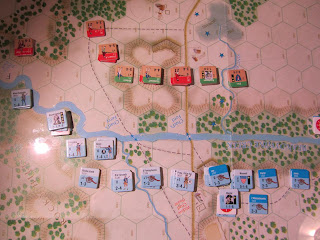
The British circumvent the American strongpoint in the center and capture two batteries of guns without casualties.

The British flank attack arrives! The Americans start building a line of defence to delay them, but army morale is crumbling.

The American center collapses. The British forces not much bigger than their own, but army morale has deteriorated to "wavering" and it makes all the difference. Victory is decided here as the Americans are routed.

The British, after taking some casualties from the massed American artillery on the left, decided to retreat outside cannon range, as there really was no need to risk a crossing anymore. The American morale was broken at the center and the army was routed.

The jeering British retreat outside cannon range. They do not need to assault the American position as the collapse of the center forces the rebel army to retreat.


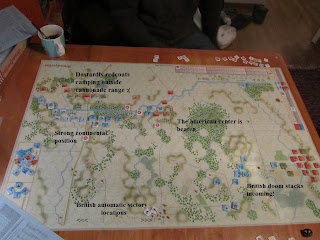
The final positions.
Another exciting game of AmRev done! I really like the army morale system in this series. Once army morale starts to drop, it creates a domino effect. The troops fight worse and it is more difficult to get positive results to get morale back to good. Also, the player who has the upper hand often gains momentum chits which he can use to re-roll bad dice and more importantly, force his opponent to re-roll those excellent rolls which might have saved the day. This really recreates the feeling of the uphill struggle the losing general has when he tried to turn the tide of the battle. It also means that battles are not fought to the last man, but rather to the point when the fight is decided on one portion of the field. I think we still have a lot to learn on how to manage army morale as most of our games have ended quite quickly. In our Germantown game, for example, the British won by attacking vulnerable militia units as they are easy to beat but cause the same morale hits as proper troops.

I think AmRev is one of GMT's best systems, combining very simple series rules (only 8 pages or so) with lots and lots of tactical complexity. They should definitely apply this ruleset to other wars as I'm not terribly interested in the American Revolution as such.

Sunday, November 6, 2011

Sunday evening Maria

A session of Maria for this sunday with Hiluksi and Jerno, the same people I've played the last three matches with. Our main interest was to see if with the lessons we had learned earlier we could prevent Prussia from winning yet again. It all hinged on Austria's aggression level, but as we found out, there's some strategic tricks the French can perform as well.

The aforementioned trick was carried out on the first turn. France moved one of the the armies it had against the Austrians back onto the Flanders map to face off against the Austrians and the Pragmatic army there. The reasoning behind this was that the pressure against Austria in the "Austria Proper" area would be diminished, so Austria could dedicate more forces against Prussia. The French would also have a better chance against the Pragmatics in Flanders now. The manoeuver couldn't be done without the moving army ending up out of supply, but it was only going to suffer during one turn. This shift combined with the fact that the Pragmatics simply forgot to move their rearmost armies during the first turn meant that the French were controlling the tempo on the Flanders map. Since it was well into the second turn that anyone noticed the mistake made by the Pragmatics, we decided not to rectify, as the French had already completed their next move.

The Austrians had learned their lesson and started to accept minor defeats against the Prussians to slow them down instead of burning all their cards in the opening stages. This worked well enough, and the Prussian advance became sluggish. What the Austrians erred on however, was that they left too few troops against the powerful Bohemian army, which capitalised on the situation at once.

By the end of the first year, the French were in control of the HRE electorate and in a strong position on both maps. The Prussians all but controlled Silesia, but also the Austrians were still very much in the game at this point.

The second year began with an important political event, the Imperial election. This meant that at the end of the turn, either France or Austria would get a permanent victory point. France started with an all out assault on all fronts, since their hand was quite strong. They fought 6 battles that turn I think, with only one defeat. At the end of their turn they were only one point away from victory, and this point would be granted by the election, should it go to the French.

The Prussians and the Austrians buried the hatchet on one front. The Prussians gave way to the Austrians so that they could retake the critical electorate city of Prague to tip the election away from the French. This carried the game to the next turn. On this turn however, the French won the game as their military campaigns had been succesful enough to take a handful of fortresses without facing opposition on this last turn.

Endgame at the Flanders map. The Pragmatics went out of supply during the previous turn after a misplacement of their supply train. It did cost the French one army though.
During the game, the toughest fighting was between the French and the Pragmatics, each claiming victories against each other, and between Austria and Saxony (a bit of a suprise). Austria attacked Saxony at the end of the first year and they both burned through a lot of cards. Austria won in the end and destroyed the Saxon army.


The final turn in Austria. The Bohemian army marched unopposed taking cities left and right, winning the game for the French.
It was refreshing to see someone else than Prussia winning the game. The army shift by the French and Austria being more careful made all the difference. Maria has been criticised by many thinking that the role of Austria is simply to act as kingmaker, but it certainly wasn't the case here. Next time, I think it will be my turn to play Austria so it'll be interesting if I can come close to a victory this time.

Thursday, November 3, 2011

Some uniform plates for the Russo-Swedish war of 1808-1809

The Russo-Swedish war of 1808-1809 has long been a pet period of mine as some of the battles in this pivotal war in Finnish and Swedish history happened in the area where I live. I was doing some research for material related to the operations in the Savolax area in the summer of 1808 and found that Google has digitized a copy of Johan Jakob Burman's memoirs. Burman is interesting because he himself fought in the battles and skirmishes in the area around Kuopio and his memoirs, out of print since the 1850's are often quoted in the books I read on the subject. Mighty nice of Google to make this available. Now I'll just have to see how much I remember of those 6 years of compulsory swedish lessons I had at school.

Anyways, the book contained an appendix with some rather nice uniform plates, most of which circulate around the 'net I think, but which I'll collate here. Enjoy!


Friday, October 28, 2011

Three eras

Looks like my autumn is very active gaming-wise since this week I had the opportunity to play three games. Each of them represented a different era and a different style of wargame.


Fire & Fury

I went to see a friend of mine in the provincial town of Riistavesi and took with me the Port Republic game I made for last Warcon. Since I had only played it through once before, I was happy to get it on the table. So, 6mm ACW it was! Port Republic as a historical wargame is a bit of a lopsided battle. The Union troops on the board are initially strong, but are quickly outnumbered by Confederate reinforcements. It's a matter on how hard the Confederates jump up and down on the Union and to set victory conditions accordingly. This is why I designed an "equalizer variant" to the battle to make the opposing parties more evenly matched. This was quite easy and historically plausible as there were a couple of "Independent brigades" in the Shenandoah valley at the time accompanying another division. We signed the transfer papers and suddenly they were supporting Shields against Jackson. The scenario proved very even now, with both sides having difficulties gaining ground. In the end It was two victory points in favor of the confederates, but the situation was very much a draw. Stonewall Jackson himself was captured by a charging Union Brigade.


Julius Caesar

The next one was a block wargame. One of Columbia Games' newer offerings, it pits the armies of Julius Caesar against those of Pompey, so the Roman civil war was next. For those who've played Columbia's wargames, the game is instantly familiar. Movement on land and sea is familiar to War of 1812, and the game features a card driven system of activations, reinforcement and special events. Players have a hand of cards to activate their units each year. The card played determines initiative that turn, the number of locations (1-4) the player may activate and how many steps the player may repair and reinforce blocks (1-3). The special events range from getting a small bonus to combat to being able to steal a block from your opponent.


The scenario starts as Caesar crosses the Rubicon and progresses for a maximum of five years. Caesar has better troops and more of them, but he has the burden of attack and a temporary inferiority at sea, so it balances out. Although in our game lady Fortuna granted great victories and humiliating defeats, the game remained very close until the very last phase and battle. On the last turn there were lots of opportunities for the game to have ended differently, but in the end Caesar lost 6-7. It was very exciting and took us about 5 hours. Of Columbia's games, I think this one is the most forgiving to a player losing his blocks that I have played since players are allowed to reinforce a lot and returning an eliminated block into play costs the same as reinforcing another for one step. The only limitation is that some of the better legions can only come back into play in certain cities, and only if those cities are occupied by friendly troops. I warmly recommend this as a light block wargame, although it definitely takes more than the two hours printed on the box if the war drags on for the whole duration.
The game was decided in Greece and Pompey took a narrow win. The green stacks with the brown blocks have Julius' troops which have been hijacked using the special "Jupiter" event card.

Valor of the Guards

Last up, some more ASL! My game of choice for tactical Hex&Counter WW2 tactical action has gotten a lot of attention recently, and I'm quite happy with the situation. We played Scenario VotG9 "Eviction notice", which takes us back to the savage streets of Stalingrad. The Soviets are attacking a German position and have to assert control over the northern half of the field, which is no easy task. Both sides had a good number of elite troops, and the Germans were equipped with a 37mm gun. The Soviets had two T-40 tanks but it was the T-34 which gave the Germans trouble. The German gun wasn't able to scratch it and I won't mention anything about the antitank rifles they had. The T-34 could pretty much just waltz up and down the streets at will without fear as long as it wasn't tied into melee.

"Eviction notice" is one of the smaller scenarios in Valor of the Guards. The Soviets must take the right side half of the field in order to win.


The fighting in the buildings and rubble was pretty much what you would expect of Stalingrad. Lots of fire, lots of casualties in melee and little ground taken as a result. After some nasty casualties on the both sides, it was the Soviets who suffered most and were unable to claim the area they needed for a win.


So, Miniatures, Blocks and Hex&Counter games all in the same week, and it's only friday! A good cross section of the most popular ways to play wargames. I really cannot name a favourite type. With miniature games, I love the visual grandeur and the hobby aspect of building terrain and painting miniatures. Block wargames are without peer to present fog of war, bluffing and uncertainty the armies faced. Hex&Counter games represent a vast variety of different levels of command, scale and realism on a fairly inexpensive medium. Each type of game has their pros and cons, and I'm happy to play almost anything in the light-medium scale. ASL is one of the few "hardcore wargames" I bother with though, and I definitely shy away from the monsters.

Sunday, October 23, 2011

ASL: s45 - Revenge at Kastelli

 I finished my first complete game of Advanced squad leader over VASL just recently. VASL is a derivative of VASSAL, a virtual boardgame application which allows you to play boardgames and wargames over the internet. The system enforces very little of the rules in the game. It just creates a virtual board you can move pieces on. The good thing about this system is that you can play against anybody around the world and can load and save large setups in the blink of an eye. You can always put the game away and continue later, no matter how big it is. Also, I really like it when VASL graphically transforms the map depending on season, special rules and so on. Something which is impossible with the boardgame. Having a bright green map and pretending its the middle of January in Finland is a bit difficult.

Anyway, I played the session with my regular ASL opponent in about 4 sessions I think. We played two hours here, and hour there. The game takes a bit longer to play on VASL as it takes time to vebally explain your actions where the same things would be easy to point out to your opponent if he was in the same room. In this scenario, Revenge at Kastelli, German paratroopers stick their nose where it doesn't belong in a Cretan village. The Greek forces, composed mostly of troops inferior to the Germans in quality, have an advantage in numbers.
I was playing the Germans, and my objective was to survive ten rounds against the Greek and prevent him from amassing 20 casualty victory points. I reckoned attack to be the best defence and worked to surround the village occupied by the Greek at the start. 
Everything is still looking good for the Germans at around the fifth turn.
Things were going just fine for half of the match with the Greek troops forced on the defensive in the village. At some point I think I forgot what I was supposed to be doing and tried too hard to take the village. The paratroopers ended up taking some nasty casualties and the Greeks got the initiative back. On the last two turns the Greek forces made a really aggressive, really effective counterattack and scattered the Germans. All I could do was watch the carnage and try to rout to safety. Still, my opponent had no trouble reaching his goals. Only a couple of small pockets of German resistance remained on the table when the greeks hit 20 victory points. I guess this teaches me to keep the objective bright in my mind. 

Overkill?
These two ASL games we've played recently really sparked my interest in the game back to life. We already agreed we'd play a scenario from Valor of the Guards next week so I guess there's some grim Stalingrad action coming up!

Sunday, October 9, 2011

Musket & Pike: Fehrbellin 1675

A dose of Musket & Pike today and my second game with the series. The battle of Fehrbellin was fought between the Swedes and Brandenburg. The Swedish have mostly heavy infantry and cavalry, but the Brandenburgians field an all cavalry force.  The Swedes must hold off the attackers until the bridge to their rear is repaired.

The game started with Sweden trying to take the Brandenburg artillery position on some low hills behind thickets. They managed to capture one battery easy enough, but were then driven back by the Swedish dragoons. In the center, the Brandenburg cavalry force launched an all out charge on both the right and left flank of the Swedes, estimating the pikemen in the center to be too much to chew.

The Brandenburg cavalry force prepares to charge the Swedish line.
The assault proved a partial success, with the Swedish cavalry on the flanks out of the way, but the Brandenburg cuirassiers couldn't quite manage to swing past the flanks to surround the heavy infantry. They were left scattered on the field with their formation broken instead.

At this point it looked like the cavalry attack had done a lot of damage, but if the heavy Swedish infantry would counterattack, the disorganized cavalry would be as good as dead. At this point, the lines of communication apparently broke down on both sides. The Swedes couldn't change their orders from "receive charge" to "charge" and the Brandenburgians couldn't stop their own charge orders. This meant that the heavy infantry units could not touch the formation broken cavalry in front of their noses and the Brandenburgians couldn't retreat them as the orders were to charge. Instead. they were forced to charge the few organized forces they had left against the Swedish line of pikemen - a suicide.

Towards the end of the game, Brandenburg managed to get their act together and pull back, while the Swedes could not catch the cavalry even after finally getting their orders changed. The game ended with 31 VP in favor of Brandenburg, a draw. Neither army was routed, but casualties were high. It was a better than historical result for Sweden.

I'm still having difficulties getting to grips with cavalry tactics. They seem like such an one shot weapon. They charge in, and both the attacker and the defender melt away. The remaining units are scattered and in a very bad threat of being overrun by a counterattack. I suppose it's realistic, but I still have a lot to learn in how to use them.

The orders system is quite interesting. It reflects the difficulty and uncertainty of making a change in plans after the battle starts quite well, and rewards players who change the order level gradually instead of trying to turn a rally into a charge in one instant. If anything, my hunger for the series has only grown.

Monday, October 3, 2011

A week worth of games

Looks like its autumn here in Finland. You can tell when people suddenly regain interest in boardgaming. Considering it's a "normal" week with no preplanned games, I got quite a few games played.

First up, a game of Battle Cry with my wife. So far it's the only wargame she'll agree to play with me, but I think that is plenty when it gives me an opportunity to use my freshly painted 6mm ACW collection. Instead of the four infantry figures the game poses as a unit, I deploy four stands of ten figures. It gives even a Commands & Colors game that nice mass effect feel. I'm tempted to do the whole set with miniatures and miniatures terrain etc. but on the other hand I like the cardboard components of the 150th anniversary edition.
We played the Pea Ridge scenario and the game was decided with heavy fighting and daring cavalry charges on the union left/confederate right. I won this time, but lost the on we played before. After the game I suggested to the Mrs. that we play War of 1812 next time, and she didn't refuse. Everything is proceeding according to plan *diabolical laughter*.


Second, a Risk 2210 session made all better by some whisky with friends. Laphroig and later Vat69 if you must know. Of the risk games, I think I like this one best, and it is good fun in a Beer and Pretzels sort of way. Somehow nobody seemed to attack me even though I took Australia and Africa on the opening turn, and I won by consolidating my position and taking the sea areas around me. Afterwards, we played some Dominion and Monty Python Fluxx, but my memory is somehow hazy on how those went.


Last, but definitely not least, I ended my long dry spell of Advanced Squad Leader last night. It was the first match in maybe 6 months and me and my regular opponent were a bit rusty on the rules. The scenario was "Romanian Hammers" from a third party Rally-Point publication concentrating on the axis minors. In the scenario, Romanian infantry forces attack a village held by the Russians. Midway through the game, two German Stug IIIG's come into play from the Russian rear. The axis forces must scatter the defenders from the village in order to win.
The Russians had deployed an MMG into a building overlooking the lines of the Romanian advance. The only safe-ish approach was a narrow stretch of woods coming to the house which the Romanians could use as cover. As the troops in the woods advanced, the Russian machinegun, made much more deadly by the 9-2 leader directing fire, was cutting down the infantry in the open. The first turns were miserable to the Romanians and they failed to survive into melee with the MG. The German tanks arrived to the Russian rear and had success against the two Russian tanks but the failure of the Romanian infantry brought disaster. The MG was pushed back by point blank fire momentarily, but the Romanians ran out of steam and we could safely stop the game without finishing the last turn.

Saturday, September 24, 2011

Maria

Last night we played a session of Maria, a wargame covering the Austrian war of succession. The game is played with three players, one controlling Austria, one Prussia and one France. The Prussian player also controls the "pragmatic army", giving him an interesting role in the game. Prussia and France are allied against Austria but Austria and the pragmatic army are allied against the French! One player has the role of playing both sides, but since there is only one winner in Maria, the mechanic works quite well.

Austria ponders his predicament as France prepares to deal punishment in spades. (in spades, get it? Ha Ha.)

The game features the politics, movements and battles of the period on a very abstract level. Fuelling every phase of the game is the nation's hand of ordinary playing cards, which he must learn to use sparingly and effectively in order to win. Spend all your cards to win that one battle and you won't have cards left to buy reinforcements or have an effect on the political phase. Spending too much in any one area of the game leads to the other parts suffering.

In our session, the game was decided on the Silesian front. While on the Flanders front Austria was busy taking the undefended towns of northern France and the pragmatics fighting it out with France over the control of the Holy Roman Empire, the Austrians were neck deep in trouble with the Prussians. In Maria, the map is divided into squares, each of which is marked with a suite of a playing card. This signifies the suite of cards which can be played in battle by troops fighting in this area. A boardgamey mechanic, but it forces the players to try and choose areas in which they  meet their enemies based on which suite their hand is strong in. As it happens, Austria's opening hand was weak in hearts, which was the suite on the area where the Prussian attack came through. Austria managed to slip with small casualties in the opening skirmishes, but lost two whole armies towards the end of the first year due to not being able to match Prussia in either forces or cards, and not being able to retreat to a more suitable area either. A large army under Neipperg was destroyed because Frederick the Great swung around his flank and cut off his line of retreat. In the end of the first year, the Austrian line versus Prussia was all but gone. This coupled with the effect that Austria fought a bitter battle against the French, burning a whole lot of cards in the process and thus not being able to buy much troops in the winter turn, meant that Austria didn't have much chances to block the Prussian advance in the next year. Two more turns and a couple of Austrian defeats later, Prussia won the game.

Austria and France deal more and more cards into the battle, burning through their hand.

The third session of Maria for me, and the third victory for Prussia. I'd say that the game is unbalanced but the talk on the Internets is that France has the advantage in the game. This leads me to think that Austria plays a crucial role in the game. If they are unlucky or too bold in the opening turns, they will give Prussia the advantage. In our games we have not yet learned to be cautious with Austria even though I think the best strategy for them is to accept small defeats in the first year and try to conserve their cards for a proper army. We'll just have to see about that in our next game.

As a boardgame, Maria is pretty unforgiving against reckless or inexperienced play. The game can easily be decided in one bad move or costly battle. As such, it isn't easy to get into, but the rules are simple enough. 
The end. The Prussian armies push the Austrians back, leaving the vital victory locations to Frederick.

This game was powered by Balvenie 14 yr. "Golden Cask" and Vat69. And beer.

Monday, September 12, 2011

Battle of Port Republic and Warcon 2011

Last weekend I was at a wargames convention in Helsinki. Boardgaming is a popular hobby in Finland and wargaming has so far been a small part of the conventions held by the finnish boardgames association SLS. The first convention for wargames specifically was held last year, so Warcon is still in the process of establishing itself as a yearly event. There still wasn't much of a crowd but I'm sure once the event cements itself into the calendar of the gamers around Finland it will become popular. SLS managed to secure support from GMT games and they were most kind to send some copies of Manoeuvre and Command & Colors games to help promote the genre here.

I took part by arranging a small demo table to promote historical miniatures wargaming. I made a small table for the Battle of Port Republic, fought during the American Civil War. The rules used were the original Fire & Fury rules and the miniatures were 6mm figures from Baccus. I was quite pleased with the table and although I did only one demo game during the weekend, there was a lot of interest in the spectacle. Here's some pics:

The table is 100 cm * 120 cm. Small, but in 6mm, it encompasses the same area a large 28mm game would.
A union division holds the northern half of the field.
Jackson sends the Stonewall Brigade against a force which outnumbers them. Will Ewell arrive in time to reinforce?

The detailed resin buildings by total battle miniatures really add to the visuals.
The battle heats up as the confederate reinforcements arrive. The union division found itself outnumbered and was routed. Note how different the colours look like in the picture with a different white balance setting in the camera. I think I prefer the previous pictures. This one's too yellow.


Apart from miniatures gaming I also got a good dose of wargames which fit in a small box. I started off with Attack Sub, and Avalon Hill oldie, which was a light card game set in the not-so-distant future when the cold war erupts into open naval conflict between USA and the Soviet Union. It was a fun filler game, although not a very deep simulation.

In Attack Sub, players try and get a better contact to enemy vessels while reducing their contact to his. Then it's torpedo time!
Then I played a game of the new Sid Meier's Civilization game. Not a wargame really, but I like Civ games so I was interested. It does capture the essence of the computer games but it's too optimization heavy for me, and I don't think the victory conditions are balanced.
Next up was Commands & Colors: Napoleonics, my second play of this C&C game. I kind of like what it adds to the series but in the end it's still the same old C&C. I was in a losing position tactically but I managed to win the game with a couple of lucky rolls. Like Memoir '44, it is a game of chance in the end.
My saturday ended with a game of War of 1812, which I keep around to teach new players how to play block games. My opponent was no newbie though and I ended up losing with the british.

Nothing Gained But Glory
On sunday, I was in for a treat. I have been trying to get a game of the Musket & Pike series on the table for years, but I've had trouble finding the opportunity or the opponent. Now I had both, and I had recently bought Nothing Gained But Glory for its smaller scenarios to teach myself the system with. The scenario was the Battle of Warksow, fought between the swedes and a coalition led by the danish sometime in the 1600's. I couldn't find anything on the battle from the Internet with a quick google, so I suppose the designers have been spending time doing their homework in the svensk krigsarkivet.

Musket & Pike didn't disappoint. Once we got the game flowing, the rules were quick to learn and we didn't do that many mistakes with them. Learning how to use the forces available properly is a different matter altogether. I think the game was mostly about both players doing magnificent yet poorly planned cavalry charges and having our cavalry wings scattered in the four winds. This time the swedish lost, but it was partially due to forgetting to use a paralyzing rule on the danish after their general was wiped out in an aforementioned cavalry charge. Still, it was good fun and I'm happy I own two boxes of the series now.

The battle of Warksow took up my sunday and after that it was time to pack up and come back home. A fun weekend and it was nice to meet people who aren't afraid to play wargames (it feels like many boardgamers have an allergy for hexes and counters). Here's a few pictures I took from the games.

Normandy '44
C&C: Ancients tournament in progress.

Crusader Rex

Race for the Galaxy. Guys, that is a multiplayer solitaire game, it's definitely not a wargame!

A prototype of.. something.

Hannibal is at it again.

Some game I've never heard of before.


A Game of Thrones
Twilight Struggle was popular.

Alone in a crowd: Steel Wolves, the solitaire naval wargame